Why ADAS calibration needs evidence
ADAS calibration is not only a technical procedure. It is also a quality control and documentation process. When a camera, radar, lidar, steering angle sensor or related system is calibrated, the workshop should be able to show what was done, under what conditions and what result was achieved.
A completed calibration without evidence can create problems later. The customer may return with a warning light, the insurance company may request proof, another workshop may question the setup, or a safety-related fault may appear after the vehicle leaves. A clean evidence pack protects the workshop and gives the customer a professional report.
This guide explains how to build an ADAS calibration evidence pack with before photos, measuring points, setup records, pre-scan, post-scan and final customer notes.
When an ADAS evidence pack should be created
Use a calibration evidence pack whenever an ADAS-related component, alignment condition or body measurement can affect system accuracy.
Common cases include:
- windshield replacement;
- front camera removal or replacement;
- front bumper removal;
- radar sensor replacement;
- collision repair;
- suspension repair;
- wheel alignment;
- steering angle sensor work;
- ride height changes;
- ADAS warning light diagnosis;
- module coding or replacement.
Always follow the correct repair procedure for the exact vehicle. Different manufacturers and models can require different targets, distances, floor conditions and diagnostic steps.
1. Start with the repair order and customer complaint
The evidence pack should begin with a clear reason for calibration. This prevents confusion later when somebody reviews the report.
Record:
- customer complaint or repair reason;
- vehicle make, model and year;
- mileage;
- repair order number;
- component replaced or repaired;
- calibration type required;
- technician name;
- date and time.
Do not write only “ADAS calibration”. Write why calibration was required, for example “front camera calibration after windshield replacement”.
2. Save a full pre-scan
The pre-scan records the condition of the vehicle before calibration. It should be saved before clearing faults or starting procedures.
The pre-scan should include:
- full module scan;
- ADAS-related DTCs;
- camera, radar and braking system status;
- communication faults;
- battery voltage;
- mileage and timestamp;
- scan tool name and software version.
If the vehicle has unrelated faults, keep them in the report. This helps explain what was present before calibration and what was not caused by the calibration work.
3. Photograph the vehicle before setup
Before moving targets or changing the vehicle position, take simple photos. They do not need to be artistic. They need to be useful.
Recommended before photos:
- front view of vehicle in calibration area;
- windshield or camera area if relevant;
- radar area if relevant;
- tire and wheel condition if relevant;
- dashboard warning light if present;
- damage or repair area;
- VIN or registration only for internal record, with privacy rules respected.
For public use or marketing images, always blur license plates, VIN, customer documents and account screens.
4. Record workshop conditions
ADAS calibration depends on setup conditions. If the floor is uneven, the vehicle is not centered, tire pressure is wrong or the target distance is inaccurate, the calibration result may not be reliable.
Record the conditions required by the repair procedure:
- floor condition;
- lighting condition if relevant;
- vehicle position;
- tire pressure;
- ride height if required;
- fuel level or vehicle load condition if required;
- steering wheel position;
- parking brake state;
- battery support connection;
- target type used.
This information shows that the calibration was not performed casually. It was prepared according to a controlled process.
5. Document measuring points
Measuring points are the core of static calibration evidence. Photos should show how the target position was measured, not only that a target was present.
Useful measurement evidence includes:
- distance from vehicle reference point to target;
- centerline reference;
- target height;
- left and right measurement comparison;
- level or laser alignment setup;
- wheel clamp or alignment fixture position;
- target board identification if relevant.
Measurements should be easy to understand later. A photo of a tape measure is useful only if the reference point is visible.
6. Static versus dynamic calibration evidence
Some vehicles require static calibration, some require dynamic calibration, and some require both. The evidence pack should clearly show which method was used.
| Calibration type | Evidence to keep | Common risk |
|---|---|---|
| Static calibration | Target photos, measuring points, workshop conditions, tool result | Incorrect distance, floor level or target position |
| Dynamic calibration | Road test notes, route condition, speed range if required, tool result | Wrong road conditions or incomplete drive cycle |
| Combined procedure | Both static setup and dynamic completion records | Stopping after only one required stage |
The diagnostic tool may show a completed procedure, but the workshop should still keep supporting evidence.
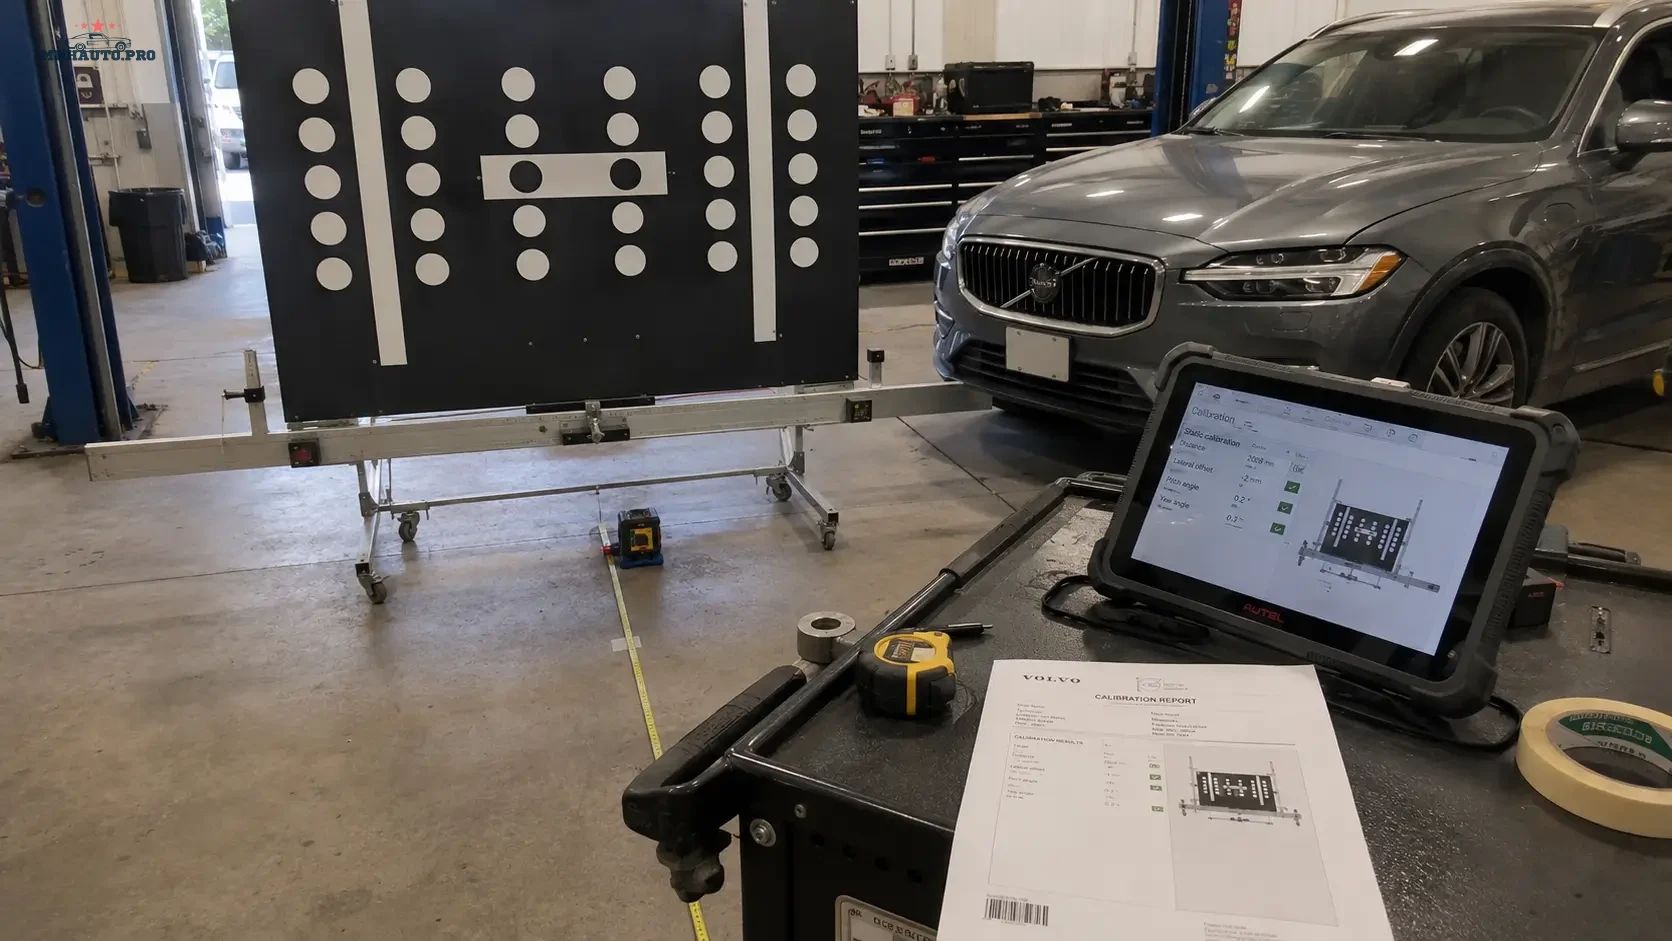
7. Save the calibration result screen
After the procedure, save the result screen or report from the diagnostic tool. If the tool provides a PDF, attach it to the job record.
The result should show:
- vehicle identification;
- calibrated system;
- procedure result;
- date and time;
- tool name;
- technician if available;
- any warnings or conditions displayed by the tool.
If the calibration fails, do not hide the result. Save it and record what was corrected before retrying.
8. Run and save the post-scan
The post-scan confirms the vehicle condition after calibration. It should show whether ADAS-related faults remain and whether additional work is needed.
Compare pre-scan and post-scan:
- which faults were present before;
- which faults cleared after calibration;
- which faults remain;
- which faults are unrelated to the calibration;
- whether a road test is recommended;
- whether customer approval is needed for further diagnosis.
This comparison helps avoid arguments about faults that were already present before the job started.
9. Build the customer report
The customer report should be clear enough for a non-technician to understand. It should not be a raw dump of scan data only.
Recommended customer report sections:
- vehicle details;
- reason for calibration;
- systems calibrated;
- equipment used;
- setup confirmation;
- calibration result;
- post-scan result;
- remaining recommendations;
- technician name and date.
For insurance or fleet work, attach before and after photos, target setup photos and scan reports.
Common ADAS documentation mistakes
- Only saving the final success screen.
- No pre-scan before calibration.
- No photos of measuring points.
- No proof of target position.
- No battery support record.
- No post-scan comparison.
- Customer report contains too much raw data and no clear summary.
- VIN, plates or customer data left visible in public photos.
Where repair data helps
ADAS procedures must match the exact vehicle. For repair procedures, component locations, calibration requirements and technical data, review WorkShopData Cars. For workshops handling mixed car and commercial vehicle work, review WorkShopData Cars and Truck.
For real-world tool discussions and workshop cases, forum access such as MHHAuto or CarTechnology can also support research, but it should not replace official repair procedure checks.
ADAS evidence pack checklist
- Repair reason is written clearly.
- Vehicle identification is recorded.
- Pre-scan is saved before work starts.
- Before photos are taken.
- Workshop conditions are recorded.
- Target setup photos are saved.
- Measuring points are visible in photos.
- Calibration result screen or PDF is saved.
- Post-scan is saved and compared with pre-scan.
- Customer report is prepared with clear recommendations.
FAQ
Is a successful calibration screen enough?
It is useful, but it is not the full evidence pack. Keep pre-scan, setup photos, measuring points, result screen, post-scan and customer report.
Do all ADAS jobs need photos?
Photos are strongly recommended when target position, measuring points or repair condition may be questioned later. They are especially useful for insurance, fleet and collision repair work.
Should the customer receive raw scan reports?
The customer should receive a clear summary. Raw scan reports can be attached when useful, but the report should explain the result in plain language.
What if calibration fails?
Save the failure result, check setup conditions, repair procedure, vehicle faults and measuring points. Do not repeat the procedure blindly without correcting the cause.
An ADAS calibration evidence pack turns a completed procedure into a professional record. It shows the vehicle condition before the job, the setup used, the measurements taken, the result achieved and the condition after the repair.